Filter by Attributes
If a vector layer has an associated attribute table, you can filter the records by one or more attributes. Right-click the layer in the Layer Manager and select Filter Records by Attributes.
When filtering attributes, a new layer named Filter (shapefile_name) will be added to the Layer Manager; records that meet the filter settings are displayed in this new layer. You can save the filter layer to a new shapefile, and you can save the filter settings you want to use again to a .json file.
To filter by attributes:
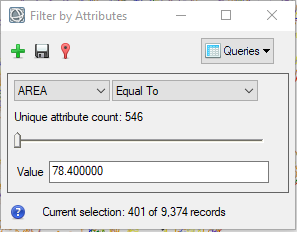
- In the Filter by Attributes dialog, select the attribute to filter by from the first drop-down list.
-
From the second drop-down list, select the filter type. The options are as follows:
- Equal To: Includes records that match the specified value.
- Less Than: Includes records with a value that is less than what is specified.
- Greater Than: Includes records with a value greater than what is specified.
- Less Than or Equal To: Includes records with a value less than or matching what is specified.
- Greater Than or Equal To: Includes records with a value greater than or matching what is specified.
- Range (Inclusive): Includes records with values that are within the specified value range. For example: if filtering by CLASS_ID and there are 10 classes, when the range is 3 and 5, only classes 3-5 will be included.
-
Range (Exclusive): Excludes records with values that are specified in value range. For example: if filtering by CLASS_ID and there are 10 classes, when the range is 3 and 5, classes 1-2 and 6-10 will be included and classes 3-5 will be excluded.
On filters that use Less Than or Greater Than comparisons, string values are handled alphabetically. For example: if the attribute is "CLASS_NAME," the filter is "Less Than or Equal To," and the value entered is "Lakes," any records with a CLASS_NAME matching "Lakes" - or with a name alphabetically before "Lakes" - will be included. Capitalization is considered in this order of preference:"LAKES," "Lakes," and "lakes."
- Use the slider bar to cycle through values from the attribute table that can be filtered on. Below the slider bar shows how many unique attribute values there are for the selected attribute. To move the Range (Inclusive) or Range (Exclusive) slider bars together, press the Shift key. You can also specify a Value in the field(s) provided and press the Enter key. Records that meet the criteria will display in the filter layer. You can change the filter layer color or its other display properties using the property sheet located below the Toolbox.
- If the results are located outside the current view, click the Go to Selection button
 to bring them into view.
 - To save the filter layer to a shapefile, click the Save As button. The new shapefile will be added to the Layer Manager.
To apply more than one filter:
- Click the Add button
 .
. - Enable the AND or OR check box to specify how to apply the filters in relation to each other.
- Set the remaining parameters as described previously.
To name and save the filter settings:
- To name a filter, select Add Query from the Queries drop-down list, enter a name, and click the green check mark. A query can contain a single attribute filter or multiple attribute filters. The query name is added to the Queries drop down list, and it is available for use while the Filter by Attribute dialog remains open. To save the query so it can be reused at another time, see the next bullet.
- To save queries to a
.jsonfile that can be reloaded into the Filter by Attributes dialog, select Save Queries from the Queries drop-down list. All named queries will be saved to the.jsonfile. - To load the file of saved queries into the Filter by Attribute dialog, select Load Queries from the Queries drop-down list and select the
fba_queries.jsonfile. The queries will be listed by name in the Queries drop-down list. file.