The Basic Structure of a Workflow
Workflows are IDL .pro files that you can run on a local system. If you want to share a workflow with others, you may choose to create an IDL SAVE file (.sav) instead. To get started, create a basic program as follows:
PRO SimpleWorkflowExample
COMPILE_OPT IDL2
e = ENVI()
...
END
The example shown here will:
- Perform QUAC atmospheric correction on a Landsat TM image
- Perform ISODATA unsupervised classification
- Smooth the classification image
- Export the smoothed image to TIFF format
First, create an ENVIWorkflow object that will act as a container for the overall workflow:
PRO SimpleWorkflowExample
COMPILE_OPT IDL2
e = ENVI()
workflow = ENVIWorkflow()
END
Then use the ENVIWorkflowStep object to add individual steps. In each step, set the TASK property of ENVIWorkflowStep to a specific ENVITask; for example:
PRO SimpleWorkflowExample
COMPILE_OPT IDL2
e = ENVI()
workflow = ENVIWorkflow()
step1 = ENVIWorkflowStep()
step1.TASK = ENVITask('QUAC')
step2 = ENVIWorkflowStep()
step2.TASK = ENVITask('IsodataClassification')
step3 = ENVIWorkflowStep()
step3.TASK = ENVITask('ClassificationSmoothing')
step4 = ENVIWorkflowStep()
step4.TASK = ENVITask('ExportRasterToTIFF')
END
The next step is to connect the output of one step to the input of another. Use the ENVIWorkflow::Connect method to do this. In the following example:
- The OUTPUT_RASTER parameter of the QUAC task is passed to the INPUT_RASTER parameter of the ISODATAClassification task.
- The OUTPUT_RASTER parameter of the ISODATAClassification task is passed to the INPUT_RASTER parameter of the ClassificationSmoothing task.
- The OUTPUT_RASTER parameter of the ClassificationSmoothing task is passed to the ExportRasterToTIFF task.
PRO SimpleWorkflowExample
COMPILE_OPT IDL2
e = ENVI()
workflow = ENVIWorkflow()
step1 = ENVIWorkflowStep()
step1.TASK = ENVITask('QUAC')
step2 = ENVIWorkflowStep()
step2.TASK = ENVITask('ISODATAClassification')
step3 = ENVIWorkflowStep()
step3.TASK = ENVITask('ClassificationSmoothing')
step4 = ENVIWorkflowStep()
step4.TASK = ENVITask('ExportRasterToTIFF')
workflow.Connect, step1, 'OUTPUT_RASTER', step2, 'INPUT_RASTER'
workflow.Connect, step2, 'OUTPUT_RASTER', step3, 'INPUT_RASTER
workflow.Connect, step3, 'OUTPUT_RASTER', step4, 'INPUT_RASTER'
END
This interconnection of inputs and outputs will establish the order of steps which will be automatically calculated.
Finally, use the ENVIUI::CreateWorkflowDialog routine to display the workflow dialog:
PRO SimpleWorkflowExample
COMPILE_OPT IDL2
e = ENVI()
workflow = ENVIWorkflow()
step1 = ENVIWorkflowStep()
step1.TASK = ENVITask('QUAC')
step2 = ENVIWorkflowStep()
step2.TASK = ENVITask('ISODATAClassification')
step3 = ENVIWorkflowStep()
step3.TASK = ENVITask('ClassificationSmoothing')
step4 = ENVIWorkflowStep()
step4.TASK = ENVITask('ExportRasterToTIFF')
workflow.Connect, step1, 'OUTPUT_RASTER', step2, 'INPUT_RASTER'
workflow.Connect, step2, 'OUTPUT_RASTER', step3, 'INPUT_RASTER
workflow.Connect, step3, 'OUTPUT_RASTER', step4, 'INPUT_RASTER'
envi.UI.CreateWorkflowDialog, workflow
END
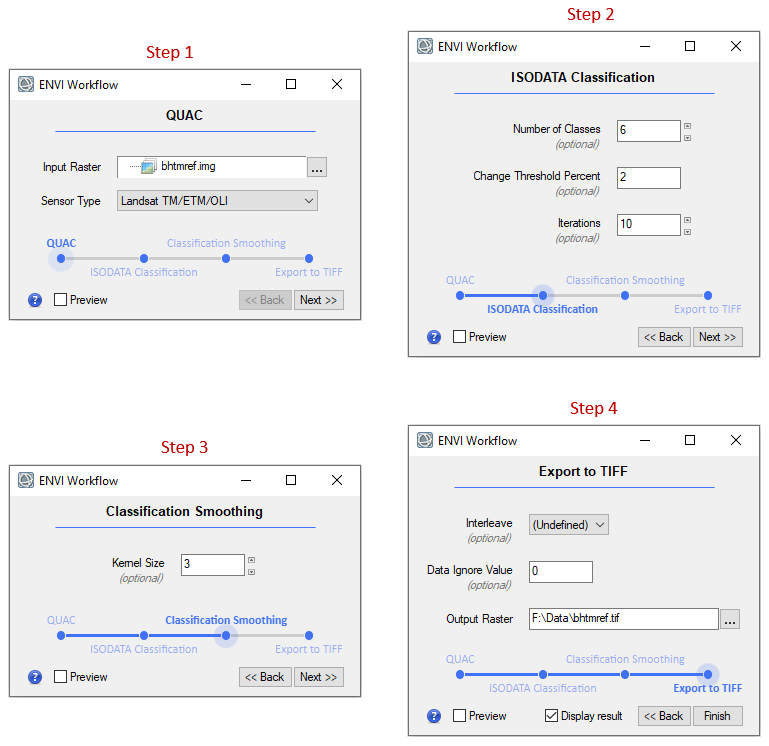
When you run SimpleWorkflowExample.pro, the workflow is displayed so that you can select files and enter parameters:

Each step has a blue timeline that shows your overall progress through the workflow. Use the Back and Next buttons or click the points in the timeline to jump to specific steps. Change parameters and preview the intermediate results as needed.
Suppose that you are in Step 4 and you click Back three times to get to the first step (QUAC). If you do not change anything and you click Next three times to access Step 4, the workflow will not rerun. However, if you change the Sensor Type (or any other parameter) in Step 1 and click Next, each step will run again through the entire workflow.
This is the most basic workflow that you can create. See the Customize Workflows topic to learn about creating workflows with more features.
See Also
Creating Workflows, Customize Workflows, Tips for Creating Effective Workflows, ENVIWorkflow, ENVIWorkflowStep, ENVIUI::CreateWorkflowDialog