Regrid Raster
This tool lets you define a custom grid to which the raster will be regridded. A custom grid definition provides the information needed to georeference rasters and vectors to a common coordinate system.
A custom grid definition provides the following information:
- Coordinate system
- Spatial (geographic) extent
- Pixel (cell) size
- Rows and columns
- Tie point pixel and map coordinates
Creating a custom grid definition requires you to know some details about the coordinate system of the current raster series and the coordinate system that it will regrid to. For example, suppose that you have a raster that is in a UTM (WGS-84) coordinate system. You want to regrid the series to a State Plane coordinate system in units of U.S. Survey Feet. One option is to define the spatial grid based on a combination of coordinate system, spatial extent, and pixel size. With this option, you must know the latitude and longitude coordinates of the four corners of the desired spatial extent. Then convert these to State Plane coordinates, according to your specific State Plane zone. (Many conversion tools are available online.) Also convert the pixel size from meters to feet.
You can also write a script to regrid a raster with the RegridRaster task.
Follow these steps to regrid a raster to a custom grid definition:
- From the Toolbox, select Raster Management > Regrid Raster. The Regrid Raster dialog appears.
- Select the Input Raster file for input.
- From the Grid Definition drop-down list, select the desired combination of grid parameters to define:
- Coord. system + extents + pixel size
- Coord. system + extents + img. size
- Coord. system + pixel size + img. size + tie point
- Enter the values for each grid parameter as follows. The available fields will vary, depending on the Grid Definition you select:
Coordinate System: Specify the coordinate system using one of the following:
- Click the Browse button
 to open the Select Coordinate System dialog. See Select Coordinate Systems for further instructions.
 - Click the Import from dataset button
 to import the coordinate system of an existing dataset.
 - Click the Import from current view button
 to have ENVI import as many grid parameters as possible from an existing view, including the coordinate system, spatial extent, pixel size, and tie point location and coordinates.
 Click the Calculate Union/Intersection button
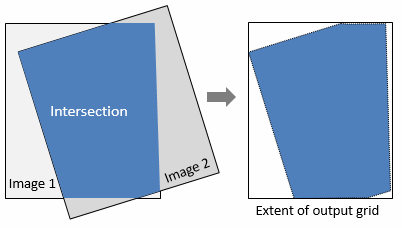
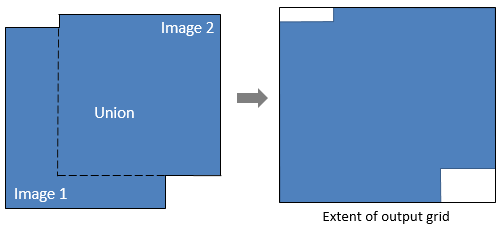
 to open the Calculate from a Group of Rasters dialog. In the dialog, select Intersection to include only the extent where the rasters overlap, or select Union to include the extent encompassed by all of the rasters.

- With an input raster in the view, click the Draw Bounding Box button
 , then click and drag the cursor to define a box outlining the extent of the layer stack.
- Click the Browse button
- Extents: Enter the spatial extent coordinates in the same units as the selected coordinate system (for example: meters, degrees, or feet).
- Pixel Size: Enter the X and Y pixel size in the same units as the selected coordinate system (for example: meters, degrees, or feet).
- Image Size: Enter the number of Columns and Rows in the grid.
- Tie Point: Enter the Pixel X/Y coordinates of the upper-left pixel location in the grid. Enter the corresponding Map X/Y coordinates for this pixel location, in the same units as the selected coordinate system.
-
Select the Resampling Method from the drop-down list:
- Nearest Neighbor (default): Uses the nearest pixel without any interpolation.
- Bilinear: Performs a linear interpolation using four pixels to resample.
- Cubic Convolution: Uses 16 pixels to approximate the sinc function using cubic polynomials to resample the image.
- To write the output to disk, select the File radio button and specify a filename and location. To produce output in memory only, select the Virtual radio button.
- Enable the Display result check box to display the output in the view when processing is complete. Otherwise, if the check box is disabled, the result can be loaded from the Data Manager.
-
To reuse these task settings in future ENVI sessions, save them to a file. Click the down arrow next to the OK button and select Save Parameter Values, then specify the path and filename to save to. Note that some parameter types, such as rasters, vectors, and ROIs, will not be saved with the file. To apply the saved task settings, click the down arrow
 and select Restore Parameter Values, then select the file where you previously stored your settings.
 -
To run the process in the background, click the down arrow next to the OK button and select Run Task in the Background. If an ENVI Server has been set up on the network, the Run Task on remote ENVI Server name is also available. The ENVI Server Job Console will show the progress of the job and will provide a link to display the result when processing is complete. See ENVI Servers for more information.
- Click OK.