Train TensorFlow Pixel Models
Once you have labeled your training rasters, you can train a TensorFlow pixel segmentation model so that it will learn what the features look like. The model can be empty or previously trained.
Training a deep learning model involves a number of stochastic processes. Training with the same parameters will yield different models. This is because of the way the algorithm tries to converge to an answer, and it is a fundamental part of the training process.
You can also write a script to train a model using the TrainTensorFlowMaskModel task.
See the following sections:
- Initialize a TensorFlow Model
- Select Training and Validation Rasters
- Set Training Parameters
- Train Deep Learning Models Using the ENVI Modeler
- References
Initialize a TensorFlow Model
Before training can begin, you must set up, or initialize, a TensorFlow model. This defines the structure of the model, including the architecture, patch size, and number of bands that will be used for training. If you are restoring a previously trained model, you do not need to initialize it.
You can also write a script to initialize a model using the InitializeENVINet5MultiModel task (multiple classes).
An architecture is a set of parameters that defines the underlying convolutional neural network. The architectures that ENVI Deep Learning uses for Pixel Segmentation (called SegUNet and SegUNet++) are based on the U-Net architecture, SegUNet is based on work by Ronneberger, Fischer, and Brox (2015). Like U-Net, they are mask-based, encoder-decoder architectures that classify every pixel in the image. For targets with an inconsistent appearance, SegUNet is the recommended architecture. Targets with a static consistent shape to their appearance are better suited for SegUNet++.
A patch is a small image given to the model for training. You can specify the patch size and number of bands when initializing a model in the steps below.
- Choose one of the following options to start the Train Pixel Object Model tool:
- In the ENVI Toolbox, select Deep Learning > Pixel Segmentation > Train TensorFlow Pixel Model.
- In the Guide Map, click this sequence of buttons: Pixel Segmentation > Train a New Model > Train Model.
The Train TensorFlow Pixel Model dialog appears.
-
In the Input Model field, select an existing model, or click the New Model link to create a new one to use.
Select Training and Validation Rasters
- Click the Add File(s) button
 next to Training Rasters. A file selection dialog appears.
 - Select one or more label rasters that you want to use for training, and click Open. The label rasters are listed in the Training Rasters field. You can use the Build Label Raster from ROIs or Build Label Raster from Classification tool to create label rasters.
- Repeat Steps 1-2 for Validation Rasters. These are separate label rasters that can be used to evaluate the accuracy of a TensorFlow model. Although classification accuracy is typically better if you use different label rasters for training and validation, you can still use the same raster for both.
You can also click the Add from Data Manager button  to load one or more label rasters that are already open in the Data Manager.
Set Training Parameters
The parameters described here are designed for users who want more control over how a TensorFlow model learns to recognize features during training. They are all optional. See the Pixel Segmentation Training Background topic to learn more about these parameters.
If you are not sure how to set the values for these fields, you can use the ENVI Modeler to create random values. See Train Deep Learning Models Using the ENVI Modeler below for details. You can also click Import Parameters from Model to use the same values from a previously trained TensorFlow Model, if you know those values work well.
- Set the Augment Scale option to Yes to augment the training data with resized (scaled) versions of the data. See Data Augmentation.
- Set the Augment Rotation option to Yes to augment the training data with rotated versions of the data. See Data Augmentation.
- In the Number of Epochs field, enter the number of epochs to run. Training parameters are adjusted at the end of each epoch. The default value is 25. See Epochs and Batches.
- Leave the Patches per Epochs field blank. ENVI will automatically determine a suitable value. You can still enter a specific value if you want. See Epochs and Batches for more information.
- Leave the Patches per Batch field blank. ENVI will automatically determine a suitable value. You can still enter a specific value if you want. See Epochs and Batches for more information.
- In the Patch Sampling Rate field, enter the average number of patches that each pixel will belong to in the training and validation rasters. The default value is 16. See Training Parameters for more information.
- In the Train TensorFlow Pixel Model dialog, enter one or more Class Names that represent the features of interest.
- If the class names are defined already in an ROI file, click the Import Names from ROIs button
 . Use the ROI Selection dialog to select the ROIs that contain the class names, and click OK.
 - Click the Synchronize Parameters button
 to populate the Solid Distance and Blur Distance fields with the class names so that you can specify different values for each class.
- If the class names are defined already in an ROI file, click the Import Names from ROIs button
- The Solid Distance field pertains to point and polyline labels only. For each class, enter the number of pixels surrounding point or polyline labels that should be considered part of the target feature. See the Solid Distance background discussion for more information. To use the same value for all classes, click the Set all to same value button
 . In the Set Value dialog, enter the value to use for all classes and click OK.
 - The Blur Distance field is used in conjunction with Solid Distance. You can optionally blur features of interest that vary in size. Blurring the edges of features and decreasing the blur during training can help the model gradually focus on the feature of interest. In most cases, you can leave this field blank; however, it is available for you to experiment with. See the Blur Distance background discussion for more information. To use the same value for all classes, click the Set all to same value button . In the Set Value dialog, enter the value to use for all classes and click OK.
- In the Class Weight field, enter the minimum and maximum weights for having a more even balance of classes (including background) when sampling. Diversity of sampling is weighted by the maximum value at the beginning of training and decreased to the minimum value at the end of training. The useful range for the maximum value is between 1 and 6. A general recommendation is to set the Min to 2 and the Max to 3 when your features of interest are sparse in your training rasters. Otherwise, set them from 0 to 1. See Training Parameters.
- In the Loss Weight field, enter a value between 0 and 1.0. A value of 0 is a good starting point and will be fine for most cases. A value of 0 means the model will treat feature and background pixels equally. Increased values will bias the loss function to place more emphasis on correctly identifying feature pixels than identifying background pixels. This is useful when features are sparse or if not all of the features are labeled.
- Specify a filename (
.h5) and location for the Output Model. This will be the "best" trained model, which is the model from the epoch with the lowest validation loss. By default, the tool will save the best and last model. Most of the time, the best model will perform the best compared to the last model, but not always. Having both outputs lets you choose which model works best for your scenario. - Specify a filename (
.h5) and location for the Output Last Model. This will be the trained model from the last epoch. - Click OK in the Train TensorFlow Pixel Model dialog.
Training a model takes a significant amount of time due to the computations involved. Depending on your system and graphics hardware, processing can take several minutes to several hours. A Training Model dialog shows the progress of training, along with the updated validation loss value; for example:
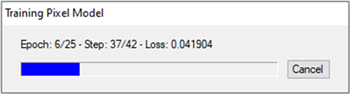
At the same time, a TensorBoard page displays in a new web browser. TensorBoard is a visualization toolkit included with TensorFlow. It reports real-time metrics such as Loss, Accuracy, Precision, and Recall during training. See View Training Metrics for details.
With each epoch, the weights of the model are adjusted to make it more correct, and the label rasters are exposed to the model again. The weights from the epoch that produces the lowest validation loss will be used in the final, trained model. For example, if you want the model to complete 25 epochs and the lowest validation loss was achieved during Epoch #20, ENVI will retain and use the weights from that epoch in the trained model.
Train Deep Learning Models Using the ENVI Modeler
ENVI Deep Learning includes two pre-built models that you can run in the ENVI Modeler. The ENVI Modeler is a visual programming tool that lets you build custom data-processing workflows in ENVI. Refer to the Visual Programming with the ENVI Modeler topic in ENVI Help for more information.
Note: The pre-built "models" described here are not deep learning models but rather model files that work with the ENVI Modeler.
You can access the pre-built models from the Tools menu in the Deep Learning Guide Map. One model provides a simple workflow for training a deep learning model, and the other generates random values for various training parameters. Follow the instructions below.
Train a Deep Learning Model
The model file named Deep_Learning_Tutorial.model trains a deep learning model to find multiple features. It prompts you for an input training raster and ROI file and uses them to train a TensorFlow model. It classifies the input raster using the trained model. This sample model provides a way to run through all of the steps at once in ENVI Deep Learning without having to select and run tools separately.
- In the ENVI Toolbox, select Deep Learning > Deep Learning Guide Map.
- From the Deep Learning Guide Map menu bar, select Tools > Train a Deep Learning Model Using the ENVI Modeler. The ENVI Modeler window appears with the
Deep_Learning_Tutorialmodel displayed.
Each yellow node in the model is based on a specific ENVITask. In this case, the model will run the following tasks:
- Build Deep Learning Raster
- Build Label Raster from ROI
- Extract Properties and Metadata
- Initialize Pixel Segmentation Model
- Train TensorFlow Mask Model
- TensorFlow Mask Classification
- Click the
 button in any of the task nodes to view the parameters for that task. Change the values of parameters as desired.
 - Click the Run button in the ENVI Modeler. The Input Parameters dialog appears.
- In the Input Raster field, select a training raster.
- In the Input ROI field, select an ROI file (
.xml) that contains labeled examples of the features you are interested in. - In the Number of Classes field, enter the number of output features/classes.
- Click OK.
The model runs for several minutes. When it is finished, the resulting classification raster is displayed in the Image window and added to the Data Manager.
Randomize Training Parameters
An ENVI Modeler file named Deep_Learning_Randomize_Training.model is provided that runs ENVI Deep Learning multiple times, each with a different set of randomized training parameters. It accepts an input TensorFlow model and training and validation rasters. Each training run produces a new TensorFlow model, which is used to classify an image. Each result is displayed separately so that you can decide which training run produced the best TensorFlow model. Running this ENVI Modeler model file provides an effective way to train a TensorFlow model when you are not familiar with the optimal training parameter values to use for your data.
- In the ENVI Toolbox, select Deep Learning > Deep Learning Guide Map.
- From the Deep Learning Guide Map menu bar, select Tools > Randomize Training Parameters Using the ENVI Modeler. The ENVI Modeler window appears with the
Deep_Learning_Randomize_Trainingmodel displayed. - Optional: You can set how much "randomness" the model will employ for training parameters. Click the button in the Randomize Parameters for Training node. In the Randomize Parameters dialog, select an option from the Method drop-down lists:
- Sobol Sequence (default): This option ensures an even distribution over the parameter space with local perturbations. It always produces the same sequence of parameter values, so it is not purely random. This allows you to start at different points in the sequence; for example, to continue where you left off in a sequence or to run different parts of a sequence on different systems.
- Random Uniform: This option chooses parameters according to a random uniform distribution.
- Although the purpose of this model is to generate random values for training parameters, you can still set any of them to fixed values by entering them in the appropriate fields in the Randomize Parameters dialog.
- Optional: Click the button in the Filter Iterator node. The Iterator dialog displays.
- To run the model, click the Run button in the ENVI Modeler. The Input Parameters dialog appears.
- In the Iterations field, enter the number of times to run ENVI Deep Learning. The default value is 25.
- Click the Browse button
 next to Input Model, and select an initialized TensorFlow model or previously trained model (
.h5) to train. - Click the Add Files button next to Training Rasters. Select one or more label rasters that were created using the Build Label Raster from ROI or Build Label Raster from Classification tool. Or, click the Add from Data Manager button to select label rasters that are currently open in ENVI.
-
Click the Add Files button
next to Validation Rasters and select any label rasters that you want to use for validation. If you do not have separate label rasters, you can specify the same rasters you used for training. - Click the Browse button next to Raster to Classify, and select a raster that you want to classify. It must contain at least as many bands as the raster that was used to train the model.
- Optional: Select an Output Directory for the output class activation rasters.
- Click OK in the Input Parameters dialog to resume running the ENVI Modeler model.

Each yellow node in the model is based on a specific ENVITask. The grey nodes provide tips on using and modifying the model.
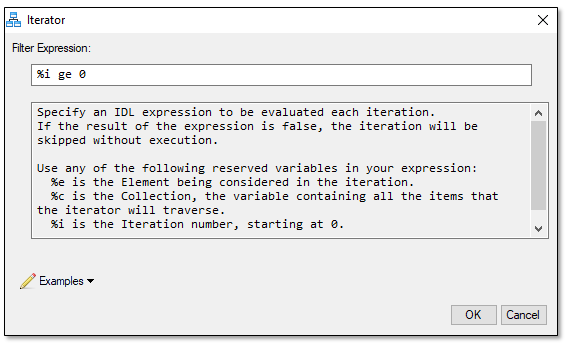
The purpose of this node is to set conditions on which the ENVI Modeler model will run. For example, you can choose to run the model only if the input raster meets certain criteria such as being multispectral, having a rational polynomial coefficient (RPC) spatial reference, or having a data type of "byte." To view and select any of these conditions, click the Examples drop-down list in the Iterator dialog.
The filter expression can be used to skip parts of the Sobol sequence for continuation or distribution of an experiment. For instance, if the randomizer was initially run with five iterations, then five deep learning runs will be completed, each with a different set of parameters. If those results are not acceptable, you can run five more iterations in the sequence by setting the Iterations value to 10 and typing %i ge 5 in the Filter Expression field. Similarly, you can split up runs among multiple ENVI instances (perhaps on different systems).
Because it performs a full training session for each iteration, this model takes a long time to run. When it is finished, the resulting classification and class activation rasters are displayed in the Image window and added to the Data Manager. Color slices are applied to the class activation rasters.
References
Ronneberger, O., P. Fischer, and T. Brox. "U-Net: Convolutional Neural Networks for Biomedical Image Segmentation." In: Navab N., Hornegger J., Wells W., Frangi A. (eds) Medical Image Computing and Computer-Assisted Intervention – MICCAI 2015. Lecture Notes in Computer Science 9351. Springer, Cham.